Test your SC's using Hardhat and Chai!
Most of the smart contracts that are being deployed into the chain have already undergone a series of tests and checks, to check for possible vulnerabilities and bugs in the functioning of code.
Every smart contract developer is required to have knowledge in smart contract tests. In this blog I will walk you through the various steps starting from the creation of a smart contract to testing it and deploying it to a test blockchain network.
Prerequisites:
- basic knowledge of JavaScript and Solidity
- understanding of how smart contracts and blockchains work.
- BONUS — have written smart contracts earlier on remix.
Setting up the Environment:
First we need to set up the hardhat project to get started working on our smart contract .
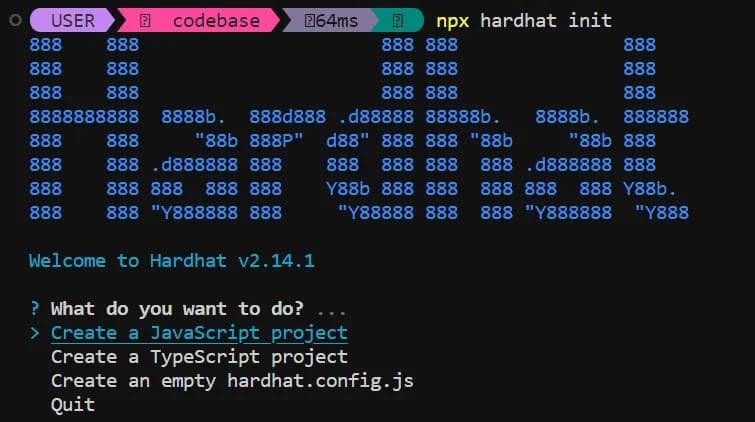
Open your Visual Studio Code and in the terminal type in ‘npx hardhat init’
This will setup the Node.js environment and the folder structure our hardhat project. We will be working on a Hardhat JavaScript project for now.
Take your time and explore all the files and configurations of this project.
Before we begin to work on our smart contract and start writing tests and deployment scripts for it, we need to make sure our ‘hardhat.config.js’ file is configured to meet our goals. That is setting up the network and solidity compiler settings.

In our config file, the network field has a user private key input. Make sure to put the private key inside of a environment variable because this key can be used to unlock the funds and other assets of the respective account.
In this article, I will demonstrate how to write basic smart contract tests for a contract that consists of essential functions. We will write code for the smart contract and discuss how to create corresponding tests to ensure its functionality.
The code for the smart contract goes like this :
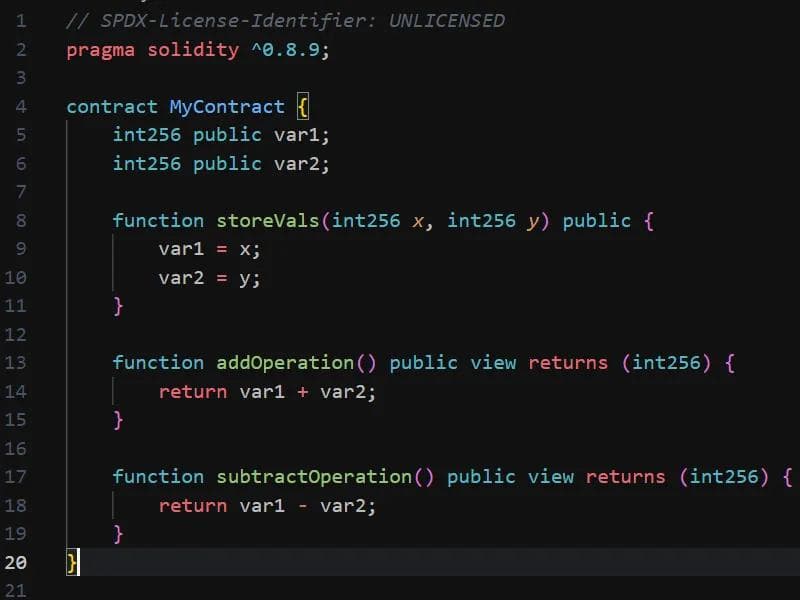
We first define two int256 variables var1 and var2 to store our 2 integer numbers that can be later used to perform add and subtract operations.
The storeVals function takes in 2 integer values (x and y) and stores them into var1 and var2.
Declaring and defining the addOperation function which is set to public visibility and view keyword is given to it so that the function can read the state variables but not modify it. It returns the sum of var1 and var2. Similarly we can do the same for our subtractOperation function which returns the signed difference value of var1 and var2.
OK! So, now we have the contract written, its time to get it compiled.
Open your terminal and type “npx hardhat compile” which will generate the artifacts folder containing the contract ABI and other build files for the smart contract.

NOTE: Make sure you have your web3 private wallet key present in the hardhat configuration file or else this would throw an error. (Use .env for securely saving and using your private key or any other sensitive information in your code).
After compiling, we can start writing the test scripts for our smart contract. Although manual testing using GUI tools like Remix IDE is an option, it would be more efficient and fulfiling for a smart contract engineer to write customized test scripts.
Let’s write some test code for our first smart contract.
We’ll be using the JavaScript testing framework called ‘chai’ which has methods and features that can be used to write the test scripts for our smart contract. Chai is a versatile library that is not only used for testing smart contracts but also finds application in writing test scripts for various other Node.js projects. One such application is for framing test case scenarios for problem solving exercises in a JavaScript Development Environment.
In addition to Chai, we’ll be also making use of the Ethers.js library. To use Ethers.js in our test file, we simply need to import or require it before writing our tests. This allows us to leverage the functionalities provided by Ethers.js for interacting with Ethereum networks and smart contracts.

We start with the ‘describe’ method to describe or declare our test suite or test group. It takes in two parameters — name of the test suite and an async callback function that will call the individual test cases within the test group.

Inside the describe callback, we define a ‘beforeEach’ function which runs before every individual tests that would be defined using ‘it’ methods.

Inside the beforeEach function, we first get the contract ABI using the ‘getContractFactory’ method from the ‘ethers’ library. This basically loads the ABI of the smart contract from the artifacts folder that was created after the compilation of the smart contract. The path for the artifacts can be set from the hardhat config file (if you are working on full stack web3 application and you want to organize all the folders and files or something).
Next we deploy the contract and create an instance of the smart contract, so that we can use it to call the contract’s methods and public state variables. ‘MyContract.deploy()’ is used to deploy the contract in some sort of hardhat’s simulated or virtual chain running locally. And then we used myContract.deployed() to create the contract instance.
Now we write a test to check whether the values passed to our storeVals function from our smart contract is storing the values or not.

Store 1 and 2 to variables a and b. Call the storeVals(a, b) method using our contract instance and pass the ‘a’ and ‘b’ values to it. Make sure you ‘await’ this call as it is an asynchronous callback. Now we use ‘expect’ method from ‘chai’ which is used for assertion related operations. Here we check whether the ‘var1’ has stored the value 1 and ‘var2’ has stored the value 2.
expect(awating for var1 value) to be equal to ‘a’ value. If its true, then it checks the next expect condition, finally if both the expect conditions are valid and true, the ‘it’ test cases passes.
Now, we test for our addition and subtraction operation.
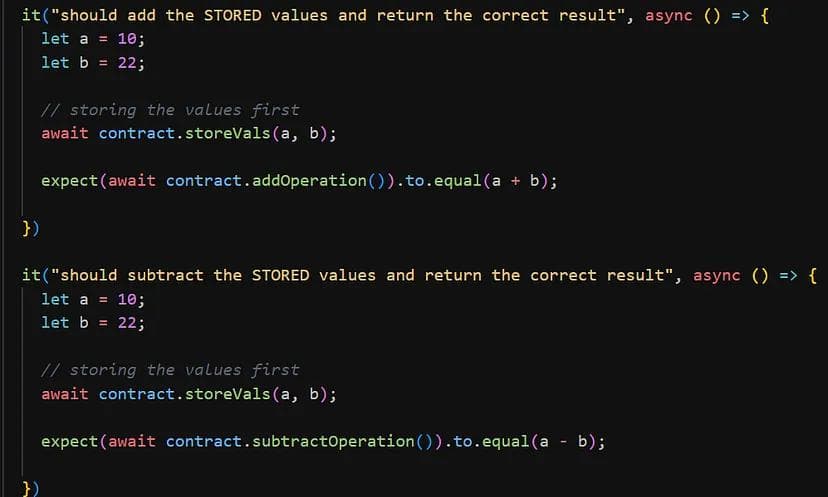
Both has the similar code except we call addOperation() method when we check for addition test and subtractOperation() for subtraction test.
The above tests is more than enough for testing our first smart contract, maybe we can also write a test for checking for integer overflow condition. Before we write that, let’s test the contract with these 3 basic test cases. Open your terminal and type in ‘npx hardhat test’ to run your test script.

Here we can see that all our test cases passing. If you see this too, YAY then, you have successfully written and tested your smart contract with your custom test scripts. If you face any issue while doing this, please feel free to tell me about it in the comment section.
Now let’s include that last test script where we’ll check for the integer overflow conditon.
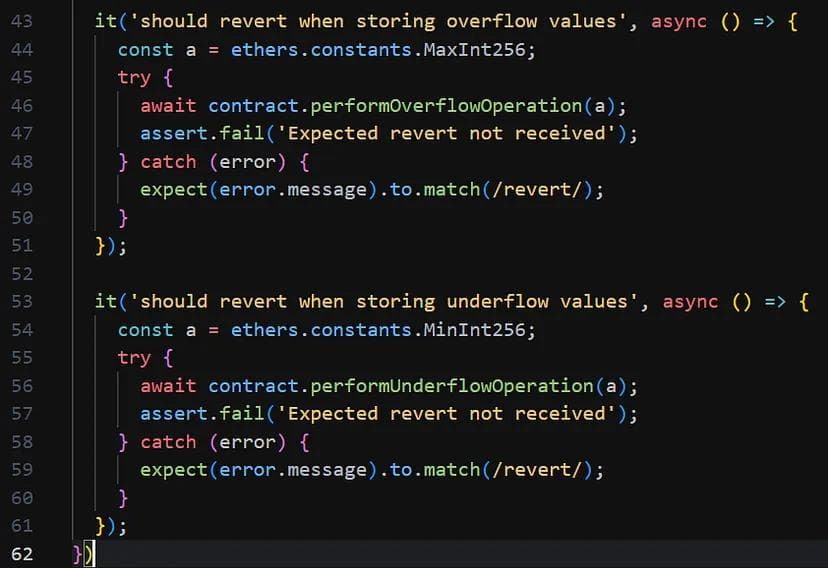
For this we created two functions in our smart contract — performOverflowOperation which takes in one value and adds 1, similarly performUnderflowOperation which returns the value with 1 subtracted from it.

Compile the smart contract again using the command ‘npx hardhat compile’ or ‘hh compile’.
If the try block doesn’t receive any ‘revert’ error from the contract side it asserts a failure message that a expected revert call wasn’t given by the performOverflowOperation or performUnderflowOperation functions, since we were checking for overflow/underflow errors.
Now, we run the test file, till now we have 5 test instances written — one for storing of sample values, addition operation, subtract operation, and finally to check for overflow and underflow conditions.
Open your terminal and type in “npx hardhat test” to run the test script.
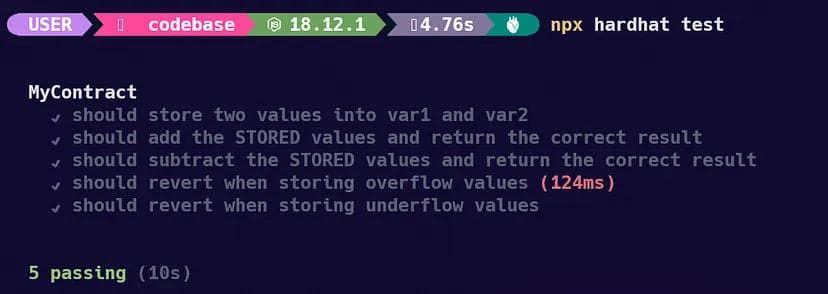
That’s all it with the testing part, you can proceed with the deployment procedures. Additionally, we can conduct further tests based on the number of functions present in our contract, aiming to identify any potential vulnerabilities.For deploying your contract, go to scripts/deploy.js. By default, hardhat would have the deployment code saved in there for its default ‘Lock.sol’ contract. Make some few changes in it like this.
For deploying your contract, go to scripts/deploy.js. By default, hardhat would have the deployment code saved in there for its default ‘Lock.sol’ contract. Make some few changes in it like this.
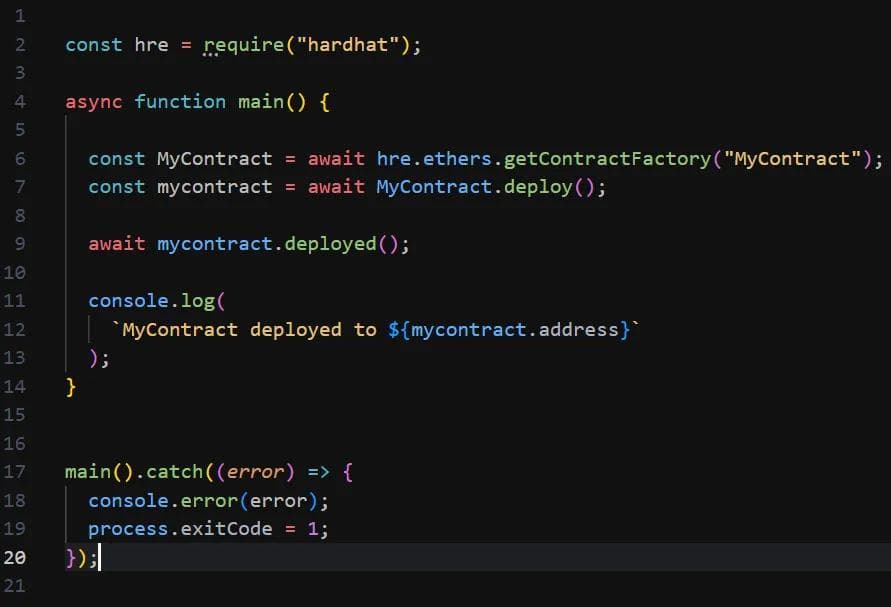
Run the deployment script using the command -

Assuming all the code is written correctly, your contract will be deployed to the Polygon Mumbai Testnet.
